

(Continued from Part 3. This concludes the post.)
Resources
Once you have your route choices figured out and considered potential barriers and dangers, the next action ought to be to take a look at potential resource requirements and availability. The very first resource I will typically take a look at is food– I constantly have some amount of emergency situation food stocked in my travel set, consisting of bags of nuts, path mix, Fritos, emergency provision bars, small freeze-dried meals, and so on. Nevertheless, for any trip home longer than 3-to-4 days it becomes tough to pack adequate food to account for the whole journey, consisting of any hold-ups I may experience along the way. As part of my route planning I consist of a couple of maps that reveal possible resource places near the starting point of my journey house. I constantly have a stash of emergency situation cash in numerous denominations as part of my travel kit so I can possibly complete any spaces in my materials before I start.
For shops and such I tend to use Google Maps or Bing Maps, as they’re a lot more commercially-oriented than OSM, ORS, or other open source map tools. For food, I’ll typically search for smaller sized locally-owned convenience and dollar stores versus the huge national chains, as the local stores will be most likely to continue running even if power heads out.
Here’s an example of the results of searching for ‘corner store’ around Lubbock, Texas:
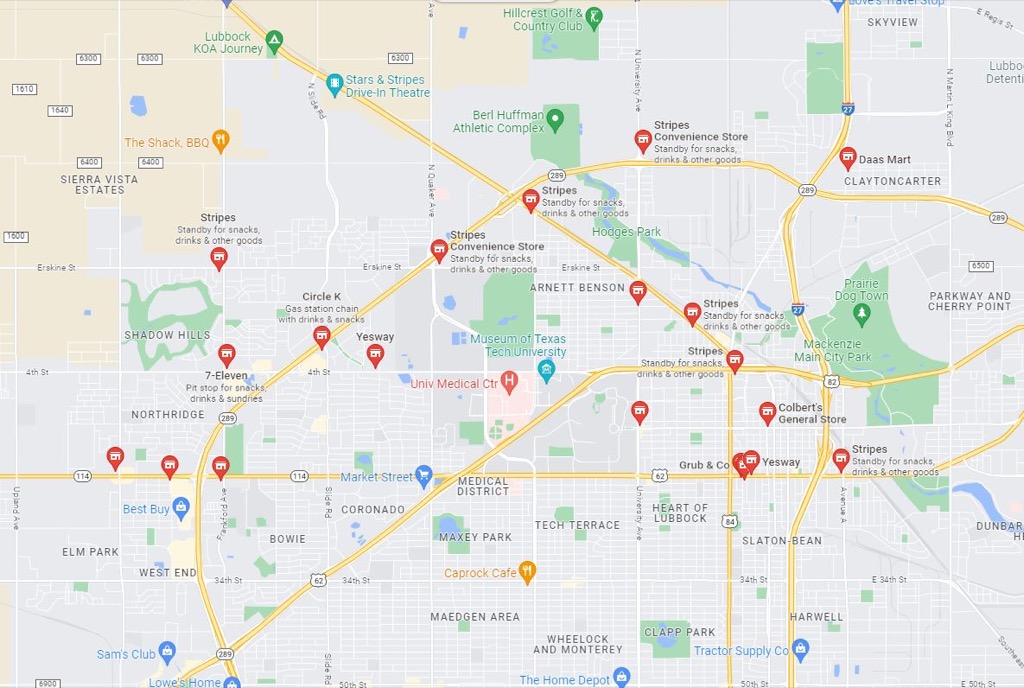
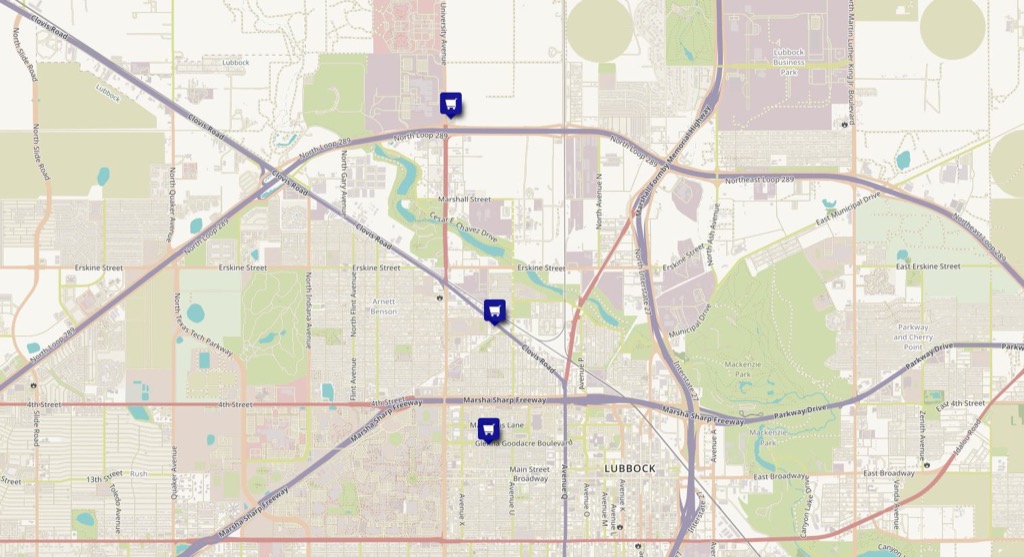
You’ll need to click on each on to discover which ones aren’t part of a chain and make a list of those. You should likewise look for dollar shops, ethnic food stores(e.g. Mexican, Chinese, Brazilian, etc, depending on what part of the nation you’re in), bodegas, and so on. Review each one and include it to a map for inclusion in your path plan file, which now illustrates what I think about one glaring weakness of a number of the available mapping applications– you can’t quickly include notes or sights to a map and wait or print it off. The OpenStreetMaps Android application called ‘OSMAnd+’ does permit you to do this, however I choose to do my route planning on my PC with a big screen. To resolve this drawback I use another online mapping tool based on OpenStreetMaps called uMap, which enables you to add markers and conserve a copy of the resulting map. You need to click on the pencil icon in the upper right corner, then click the marker icon and click on a location on the map to add the marker. As soon as you’ve included a marker you can alter it’s description, color, icon, etc. Here’s a screen clip that shows some examples of fictional grocery stores that I added near Lubbock, TX:
Other types of resources I draw up are locally-owned bike stores, camping/outdoor shops, weapon stores, hardware shops, nation stores and thrift stores. While I try to load as total of a get home package as possible to cover as lots of contingencies as I can, there might be spaces in the preparations I bring that I can fill prior to beginning my trip home, and knowing where I can purchase or get those resources makes starting a lot easier.
Another great function of uMap is that you can save the markers you have actually added and when you come back to the web site later on they’ll still exist. I have actually included and saved hundreds of markers for stores, nuclear reactors, chemical plants, foraging areas, jails, and so on, so now when I’m preparing a path I can simply go to uMap, zoom into the areas along the path I’m planning and save a screen clip of them in my route plan document.
Depending upon the length, particular route and season, you may likewise have the ability to take advantage of naturally-available food sources along the method. The definitely simplest alternative is to forage for edible plants on or near your route, and the website Falling Fruit offers an interactive map revealing places where others have actually found edible plants in the wild. Keep In Mind that Falling Fruit is fairly new and relies on user contributions for much of its material, but there are currently around 1.5 million areas identified worldwide. You can determine possible foraging locations and consist of screen clips of the map(s) in your route plan. Other good resources to include in your kit are location-specific foraging guides by Falcon Guides and basic foraging referral guides by Acorn Naturalists.
For actually long trips you might require to think about searching, fishing or trapping. Searching and trapping places are beyond the scope of this article, but if you’re searching for prospective fishing areas along your path take a look at FishBrain.com, Fishidy.com, and Fishermap.org.
Water (Once Again)
Earlier I went over water as both a potential obstacle along with a potential travel path; nevertheless, you also need to consider the water you’ll require to take in during your journey. Depending upon the temperature levels and your level of exertion you can start to feel the results of dehydration in only a couple of hours, and you could become immobilized in a day or two, so discovering water sources along your route is important. Keep in mind that I’m presuming you have some method of cleansing surface area water readily available such as a filter, water filtration tablets or boiling. As part of my normal travel routine among the very first things I do, when I arrive at my hotel, is to take out a 1 gallon (3.8 L) ziplock freezer baggie, fill it with water and leave it in my room’s sink during my stay. I normally have my 32oz. (1L) Nalgene plastic bottle and a number of 1L soft water bottles with me, so if an emergency turns up and I need to skedaddle rapidly I can fill them from the ziplock bag and get moving without having to fret if the water is out.
Remember that 1 gallon of water weighs around 8.3 lb (3.7 kg), so you’re not likely going to be able to bring more than 1 gallon at a time. With an advised rate of water usage of around 1 gallon daily, you’re going to require access to water sources along your route if your trip is more than 2 days or so. In some areas like New England you can’t go more than a mile or more without stumbling upon a small stream, river, pond or lake, however in other parts of the United States (and the rest of the world) you might potentially walk for days and not see water. If parts of your prepared route take you through drier locations you may need to manually adjust your route to take a trip straight in between water sources, which are typically the blue locations on ORS/OSM.
I ‘d also caution you against assuming that just because a map shows a surface area water function that does not necessarily mean that the water will exist when you get there. Some surface area water sources are seasonal, and you should also check to see if the location you’ll be traveling through is currently in a drought, which can considerably decrease available surface water materials. The US Dry spell Display preserves a present map of all locations of the US impacted by dry spell; you can click a region to get a more comprehensive county-level map. You should normally attempt to map a path in between bigger water sources, as those are most likely to be present under a wider variety of conditions.
You Can’t Stop the Signal
Having present info on what’s occurring and where can make a huge distinction in your ability to get house quickly and safely. Understanding that a bridge is closed down or collapsed, where rioting is taking place, when a chemical plant is on fire and where a forest fire is raving can enable you to adjust your path on the fly and substantially increase your opportunities of getting house. After practically any kind of catastrophe aside from an EMP the radio waves will probably be alive with traffic on what’s occurring, where’s it taking place, who needs assistance and great deals of other beneficial tidbits, so I always include lists of local radio frequencies for the locales along my prepared path(s), together with higher-level state and nationwide frequencies. RadioReference.com is the supreme source of info on radio frequencies utilized in the US, and I constantly include a portable scanner radio in my travel set.
Because a lot of police in the US have actually relocated to trunked radio systems, I typically bring something like a Uniden BCD325P2, which I program with the various frequencies for an offered journey. I save these scan plans on my PC so I can rapidly load them onto the radio for journeys I take regularly. If you have a radio that isn’t programmable you can consist of a list of appropriate radio frequencies in your get-home strategy notes. Keep in mind that you don’t need to purchase a handheld scanner that supports trunked radio in order to get important info– a more economical scanner like the Raddy RF760 or the Bearcat SR30C can still allow you to listen to non-trunked law enforcement, emergency services, air and marine bands, town services, AM/FM, shortwave and numerous other prospective details sources. Even if the catastrophe is something that brings down the power grid, lots of radio sources will still have the ability to transfer for a minimum of a few hours if not days later so you can still collect helpful information.
The Route Plan
Based on all of the ideas and information sources talked about, here’s what the summary of my basic path plan appears like:
- Location name
- Month-to-month typical temperatures (if I might using this path once again in the future)
- 10-day weather report (clipped day prior to trip)
- Screen clip of proposed path
- If the route is longer than a day or more, I’ll also include extra screen clips revealing a more detailed breakdown of each sector and prospective break/sleeping locations along the route
- Map(s) revealing prospective risks along the route
- Flooding, nuclear reactors, chemical, jails, etc.
- Map(s) of potential train and/or power line path alternatives
- Map of potential resources near path beginning point
- Map(s) of potential resources en-route
- List of pertinent radio frequencies
The size of the path plan differs, depending on the range I’ll need to cover, the variety of risks, and so on, however it’s generally around 5-6 pages.
Going Mobile
Because you probably will not have your PC with you when you’re away from home you must think about integrating your mobile phone (phone or tablet) into your get-home path preparation and execution. Earlier I went over the capability of Joplin to integrate notes (and thus route strategies) throughout various gadgets using a cloud service, so you need to make sure you set up and configure Joplin on your mobile phone so you can have all of your route strategy information with you.
For mapping and navigating using my mobile device I use OSMAnd, with all pertinent maps for my path downloaded in your area onto the device. This permits me to utilize GPS to track where I am along the route and get back on track if I have to detour. As a perk, OSMAnd has among the best user manuals I have actually ever seen for an Android application, so learning to use it is quite simple.
A number of quick ideas on mobile devices and GPS prior to I continue:
- Keeping a mobile phone powered over a long trip isn’t that difficult– refer to my previous article ‘Power To Go, parts 1 and 2‘ for some ideas.
- While federal governments can disable or intentionally deteriorate their GPS systems, my present phone (and most modern mobile devices) support several GPS systems consisting of GPS (United States), Beidou (China), Galileo (EU) and GLONASS (Russia), so four various federal governments would have to close down or deteriorate their GPS system before I couldn’t use it efficiently on my phone, which would more than likely only happen throughout a major world war.
- The 4 different GPS systems combined consist of around 125 satellites, and a great variety of them would have to be disabled or ruined, either intentionally targeted or struck with an enormous CME, in order to be rendered inefficient.
- While older GPS satellites relied greatly on ground support group to preserve their precision, the existing generation ones are much more robust and accurate, so even if the ground facilities for all four systems was destroyed I might continue using GPS for months or even years before the precision seriously abject.
OSMAnd permits you to import a track of your proposed get house path, which you’ll need to export from ORS on your PC. As soon as you have actually completed your route in ORS, click the cloud/down arrow icon in the ‘Path Particulars’ section on the left side of ORS and a download window will turn up (see photo below).
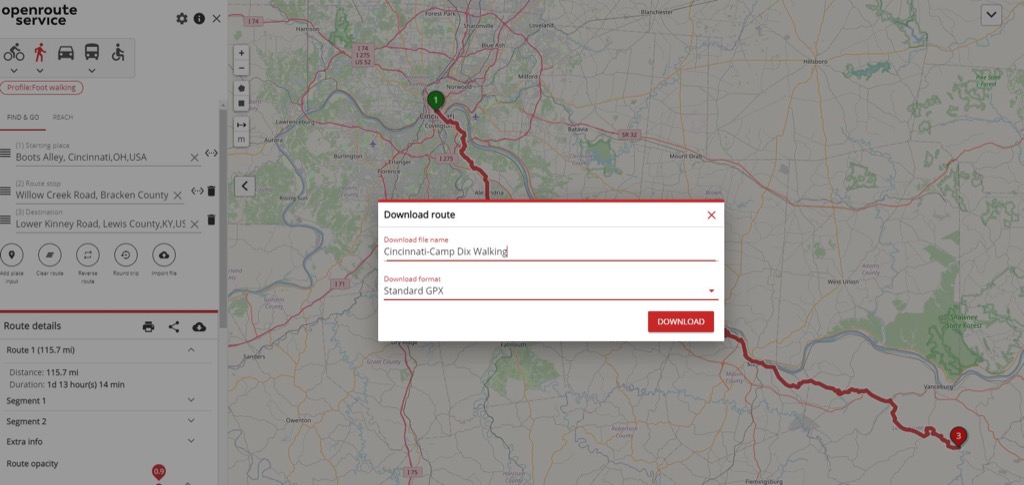
You can change the name of the path to anything that works for you, and choose the download format– I suggest using ‘Basic GPX’ for OSMAnd. When you click ‘DOWNLOAD’ it’ll bring up a file internet browser and you can wait where you desire; when you have actually waited you’ll need to transfer it to your mobile phone and import it into OSMAnd. Once the import is done it’ll reveal your planned path on the map(s). Now when you’re on your route home you can track your location, recognize your position relative to prospective risks you listed in your route plan, and recognize possible detours if needed.
Conclusion
No one wants to believe they’ll be far from house and enjoyed ones if a catastrophe strikes, and if it does happen you’ll wish to have the ability to get house as rapidly and as safely as possible. In this short article I’ve discussed my method to preparing get house routes and the tools and resources that I utilize, which ought to supply at least a beginning point and some standard ideas on how to prepare a route. Everyone’s requirements and opinions are going to be various, so I suggest you consider the types of travel and journeys you might go on and determine what route preparation technique works best for you. There are dozens of mapping tools, route preparation tools, info web sites and other resources readily available, so spend some time doing some research and trying various choices.